Emacs Workspace: IDE + Yet Another Jupyter
Table of Contents
(You are recommended to read this blog here or read it on your Emacs)
(This article is not intended for Emacs beginners, but for those who have coded in Emacs for some months)
This blog is my configuration of Emacs as a personal workspace, includes:
- Use Org mode Babel as yet another Jupyter and can preview LaTeX TikZ pictures;
- Use Org mode to generate blog pages and deploy to VPS, not rely on Hugo and Hexo;
- A mini-IDE for programming.
1. Before You Start
You are recommended to read this blog here, or download from the repo then read on your Emacs locally.
This article is not intended for Emacs beginners, but for those who have coded in Emacs for some months.
1.1. What You DON'T Need And What You Need
Many people shared how they use Emacs as an OS. My goal is really humble in comparison. I DON'T require Emacs to
- Browsing the web — Emacs's EWW can indeed do this, but I have never use it to browsing the web;
- Reading E-Mail — Gmail works fine (I have configured Gnus, but don't want to share it for privacy reason);
- Reading PDF — Emacs's built-in PDF reader doesn't support continuous scrolling, and cannot take notes;
- Translation and Grammarly — Use browser;
- Listening to Music — Use VLC;
- …
In principle, all of these requests can be satisfied in modern browsers and GUI applications. If, according to some cynical persons, that "text browsers are orthodox and all other GUI browsers are heretical", then reading PDF violates their own credo.
However, if anyone can implement these features, I'd really appreciate it:
- editing files & run tests in console (which is what an IDE should look like).
- Yet another Jupyter, in Emacs
- Execute code block by block;
- Render/preview results in LaTeX.
- Execute code block by block;
- Org mode to export blogs
- Not rely on Hexo or Hugo;
- Looks like Hexo's NexT.Pisces.
- Sidebar TOC.
- Not rely on Hexo or Hugo;
Math and science students are very attached to the block-by-block execution feature of Jupyter and Mathematica. Mahmood Sheikh made it possible to use Emacs Org mode as Jupyter. This article is inspired by that.
1.2. Refs
Use Emacs as an IDE:
- 29 Maintaining (GNU Emacs Manual)
- C/C++ Development Environment for Emacs
- What's your setup for C/C++ in emacs ? : emacs
- GitHub - junahan/junahan-emacs: Emacs config for c/c++
Use Emacs as yet another Jupyter:
- Mahmood Sheikh: the real reason emacs is superior - org+latex+sagemath : r/emacs 👍
- Mahmood Sheikh's repo: mahmoodsheikh36/dotfiles: my config files for various programs like emacs
- 怎样用 Emacs 做所有事 - YouTube
1.3. My Preference on KBD
As you can read from many other blogs, the author's editor's usage history affects her/his Emacs config preference, especially the key-binding. For example, if the person has used Vim previously, it's very likely that she/he will use evil, the plugin that uses the Vim's kbd in Emacs. I used Sublime Text before, and don't have history baggage on Vim, so I don't use evil, ivy, helm etc other popular plugins (I think they dirty the native configurations and increase unnecessary complications).
I customized shortcuts in init-kbd.el, s.t. operations like single line scroll, compile etc can done with left hand. Here are some of them:
C-z&M-zare bounded to one-line scroll down/up. They were previously bounded tosuspend-frame(nothing but minimize to system icon) &zap-to-char, both were barely used, so I make full use of them.C-x C-v&C-x M-vare bounded to half screen scroll down/up.C-vis bounded to yank, because full screen scroll (i.e. Page Down/Up) was barely used.M-qis bounded toprevious-commandin the Minibuffer mode. This command was bounded toM-pand you have to use right hand. Bounding toM-qcan free your right hand.M-eis bounded to<return>.M-ewas previously bounded toforward-sentence, barely used. So that you can do "Enter" by left hand.C-<tab>&C-S-<tab>are bounded tonext/previous-window, so that you don't needC-x oto do so (ouses right hand).
1.4. Structure of the Repo
The code is available on this repo.
1.4.1. Emacs & Org mode Config
Consists of the following. Read Chapter 2 for detail.
.
├── .emacs.d/
│   ├── ctags/
│   │   ├── TAGS
│   │   ├── TAGS-linux         /* large file */
│   │   └── TAGS-verilator
│   ├── init.el
│   ├── lisp/
│   │   ├── init-edit.el
│   │   ├── init-gnus.el       /* private */
│   │   ├── init-kbd.el
│   │   ├── init-opt.el        /* private */
│   │   ├── init-org.el
│   │   ├── init-package.el
│   │   ├── init-progmodes.el
│   │   ├── init-sessions.el
│   │   ├── init-utils.el
│   │   └── init-view.el
│   └── snippets/
│       └── org-mode/
│           ├── ditaa
│           ├── latex-drawer
│           ├── latex-graphics
│           ├── properties
│           ├── sage
│           └── shell
├── .sage/                     /* SageMath config, enpower your Org-mode */
│   └── init.sage
└── texmf/                     /* LaTeX    config, enpower your Org-mode */
    └── tex/
        └── latex/
            ├── common.sty
            └── page.sty
1.4.2. Blog config
Consists of the following. Read Chapter 3 for detail (or this in CN).
.
├── blog.el                    /* script to generate html and deploy */
├── Makefile                   /* make g, make s, make d */
├── README.org                 /* It's index.html */
└── static
    ├── Cola.png
    ├── font-awesome/
    │   ├── css/
    │   │   └── all.min.css
    │   └── webfonts/
    │       ├── fa-brands-400.woff2
    │       ├── fa-regular-400.woff2
    │       └── fa-solid-900.woff2
    ├── head.html              /* layout */
    ├── preamble.html          /* layout */
    ├── postamble.html         /* layout */
    └── main.css               /* css    */
1.4.3. Sample Projects of Mini-IDE
Instead of focusing on the contents of .emacs.d (like many articles talking about), I would like to tell you more about the project's dir. This is because each project dir have their own structure, and it is unwise to write the global configuration in .emacs.d.
There are 4 sample projects. mini-ide/ & eglot-clangd/ & eglot-ccls/ have almost the same structure, while ede/ has slightly more (it is a minimum GNU make project). Read Chapter 4 for detail.
.
├── mini-ide/ or eglot-clangd/ or eglot-ccls/
│   ├── build/
│   │   ├── config.h
│   │   └── Makefile
│   ├── compile_commands.json  /* exists in eglot-clangd */
│   ├── .dir-locals.el
│   ├── include/
│   │   └── myproj.h
│   ├── Makefile
│   ├── src/
│   │   ├── mylib.c
│   │   └── Makefile
│   └── tests/
│       ├── main.c
│       └── Makefile
└── ede/                       /* a GNU make project */
    ├── AUTHORS
    ├── ChangeLog
    ├── configure.ac           /* important */
    ├── .dir-locals.el
    ├── include/
    │   └── myproj.h
    ├── make-clean.sh          /* just a script to reset the content back to the state before build */
    ├── Makefile.am
    ├── NEWS
    ├── README
    ├── src/
    │   ├── mylib.c
    │   └── Makefile.am
    └── tests/
        ├── main.c
        └── Makefile.am
1.5. Recap: C-h to Fetch Info
Use C-h v to see a variable. Execute the following command to reset it.
(setq foo (eval (car (get 'foo 'standard-value))))
where the "execute" means, place the cursor at the end of the emacs-lisp's sexp, then C-x C-e.
Use C-h c or C-h k to see the information of a key bindings.
2. Org Mode: Yet Another Jupyter Lab
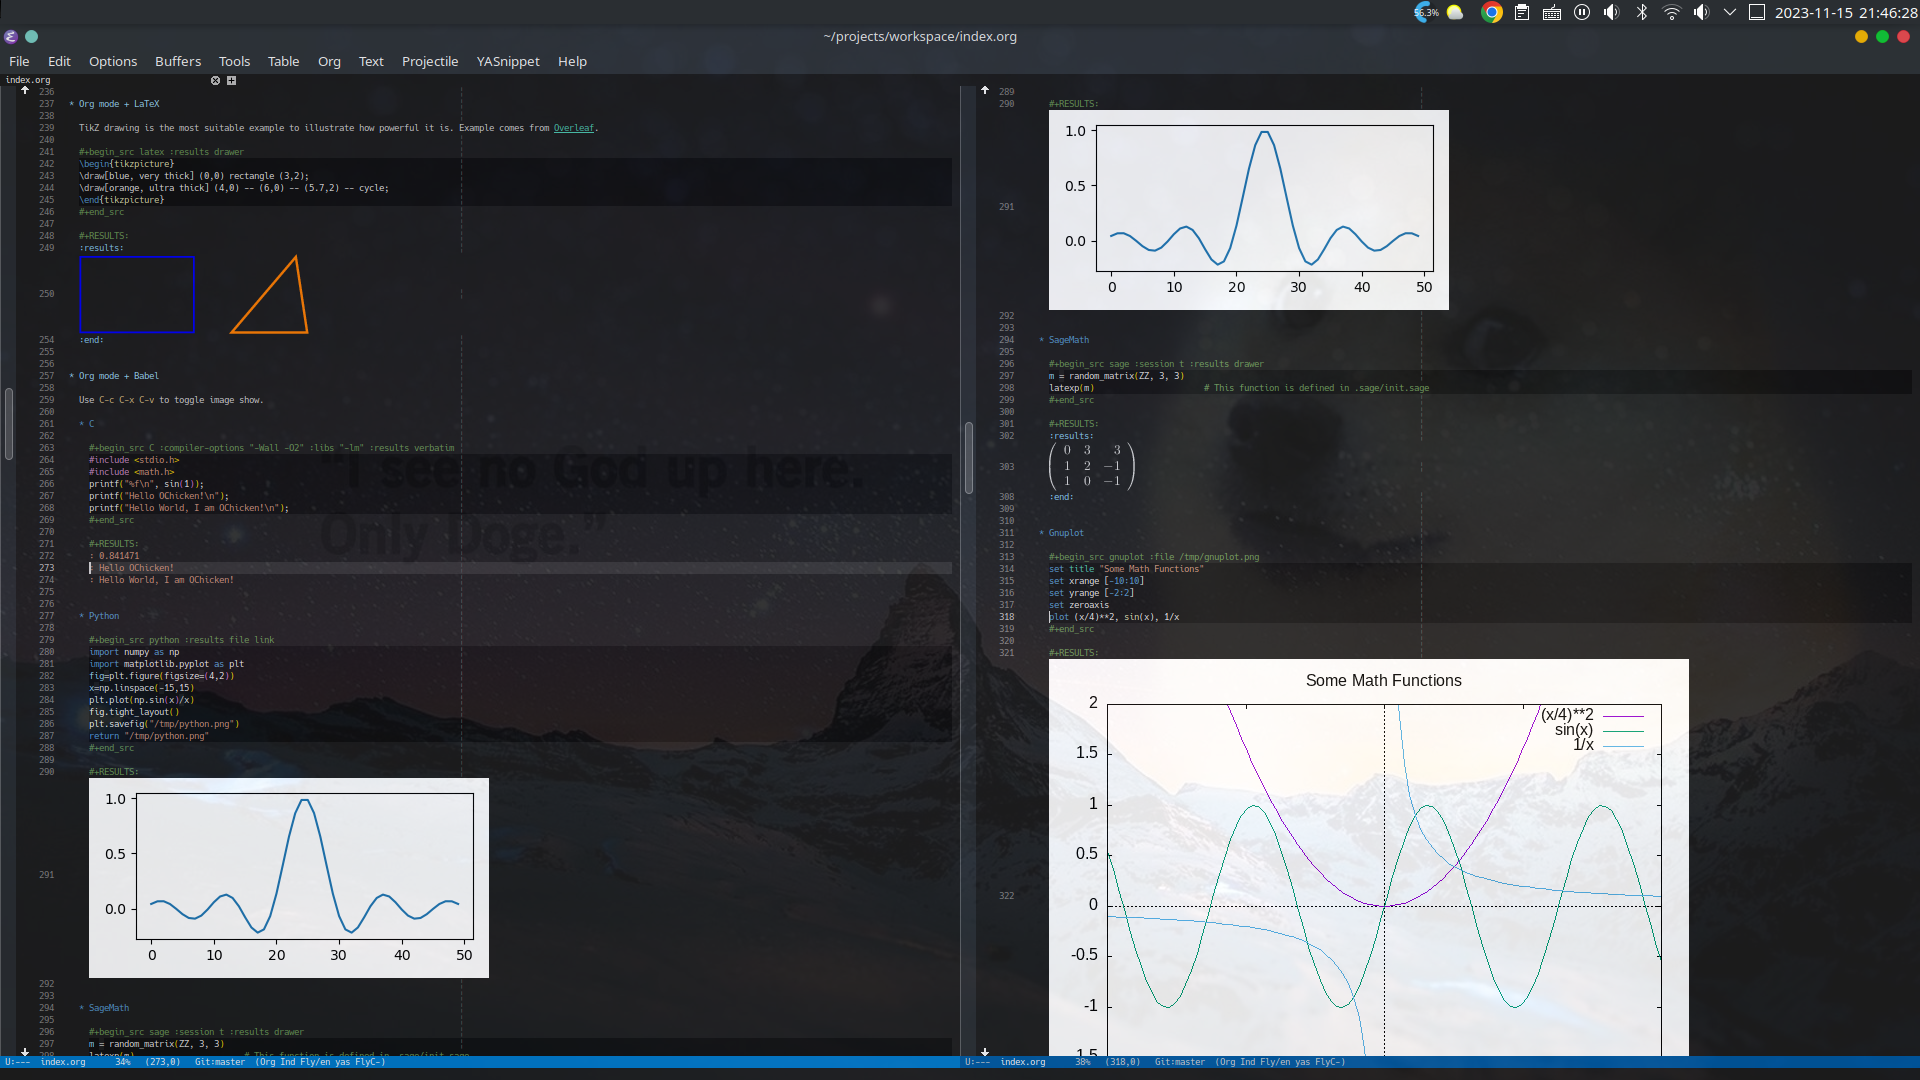
You can use Org mode just like using Jupyter Lab. Open me (README.org) in Emacs to see how powerful it is.
If you are currently viewing README.org in your Emacs, you would notice that there are many options after the heading of each src-block. It's very tricky to set them, and the examples provided in this chapter are my daily-used settings. Click Sec 16.6 to read the details.
2.1. Org mode + LaTeX
TikZ drawing is the most suitable example to illustrate how powerful it is. Example comes from Overleaf.
\begin{tikzpicture}
\draw[blue, very thick] (0,0) rectangle (3,2);
\draw[orange, ultra thick] (4,0) -- (6,0) -- (5.7,2) -- cycle;
\end{tikzpicture}
2.2. Org mode + Babel
Use C-c C-x C-v to toggle image show.
2.2.1. C
#include <stdio.h>
#include <math.h>
#include <gcrypt.h>
typedef struct gcry_mpi *MPI;
void show_mpi (MPI a)
{
        gcry_error_t err = GPG_ERR_NO_ERROR;
        gcry_sexp_t data;
        char *buf;
        size_t size;
        err = gcry_sexp_build(&data, NULL, "%m", a);
        if (err)
                fprintf(stderr, "Error in %s.", __func__);
        size = gcry_sexp_sprint (data, GCRYSEXP_FMT_ADVANCED, NULL, 0);
        buf = (char *)malloc (size);
        gcry_sexp_sprint (data, GCRYSEXP_FMT_ADVANCED, buf, size);
        fflush(stdout);
        //fprintf (stderr, "%s", buf);
        printf("%s", buf);
        free (buf);
        gcry_sexp_release(data);
}

int my_lib_function() {
        MPI GPQHE_TWO;
        GPQHE_TWO = mpi_new(0);
        mpi_set_ui(GPQHE_TWO, 2);
        show_mpi(GPQHE_TWO);
        mpi_release(GPQHE_TWO);
        return 0;
}

int main()
{
        printf("%f\n", sin(1));
        printf("Hello OChicken!\n");
        printf("Hello World, I am OChicken!\n");
        my_lib_function();
        return 0;
}
Though it's off-topic, it's still worthwhile to mention cling. It is a wonderful software to interactively execute C/C++ code, like IPython. I use cling for years and it help me accomplished GPQHE. It worth a paragraph to praise 👍
2.2.2. Python
import numpy as np
import matplotlib.pyplot as plt
fig=plt.figure(figsize=(4,2))
x=np.linspace(-15,15)
plt.plot(np.sin(x)/x)
fig.tight_layout()
plt.savefig("/tmp/python.png")
return "/tmp/python.png"
2.2.3. SageMath
m = random_matrix(ZZ, 3, 3)
latexp(m)                      # This function is defined in .sage/init.sage
2.2.4. Gnuplot
set title "Some Math Functions"
set xrange [-10:10]
set yrange [-2:2]
set zeroaxis
plot (x/4)**2, sin(x), 1/x
To use data in the current buffer, you can do so:
import numpy as np

x = np.linspace(0, 2*np.pi, 100)
data = list(zip(x.tolist(), np.sin(x).tolist(), np.cos(x).tolist()))
return data
You will notice that the result is prefixed as #+RESULTS: input, where input is the name for the data that to be parsed to the gnuplot to plot:
set term qt
set multiplot layout 2,1 title "Multiplot"
set xrange [-pi:pi]
set ylabel "y"
set key bottom right
set zeroaxis
set grid

unset xlabel
set yrange [-1:1]
plot data using 1:2 with linespoints linewidth 1 title "sin",\
     data using 1:3 with linespoints linewidth 1 title "cos"

set xlabel "x"
set yrange [-20:20]
plot data using 1:4 with linespoints linewidth 1 title "tan"

unset multiplot
3. Org Mode: Export Blog
As you can see in the footer, this blog is generated by Emacs Org mode. The theme is pretty similar to Hexo's NexT.Pisces, but it is generated neither by Hexo nor Hugo. The following video shows how the blog page is locally built. This chapter is available in CN, read this.
3.1. Introduction
3.1.1. My Preference
I use Hexo previously for many years. Its workflow is simple: write md files in your editor, hexo g to generate html files, hexo s to locally preview in http://localhost:4000/, and hexo d to deploy to VPS. Its NexT.Pisces theme is wonderful. Besides this theme are many other choices on its official side. This fact worth a paragraph to praise 👍
However, Hexo doesn't have a nice support on Org-mode. Nevertheless, there is a plugin hexo-renderer-org, but its currently no longer support. Due to this drawback, many Emacser turn to Hugo. But Hugo doesn't have NexT.Pisces.
Later I realized that, CSS file contributes 90% of what makes a web page look nice. Hexo and Hugo are nothing but use a series of user-friendly interface to generate the desired CSS. When you are not sure which theme you like, you can use this way to try various themes; after you determined this theme and this scheme, you can take the generated main.css and DIY on your own, and finally add this line to the beginning of the Org file:
#+html_head: <link rel="stylesheet" type="text/css" href="path/to/main.css"/>
3.1.2. Your Choices of CSS
There are many choices of CSS files:
- css - How to use display Table of Contents in sidebar with arbitrary HTML file? - Stack Overflow
- Transform your Org mode files into stunning HTML documents: a Read the Docs-like theme
- org mode - How to export an html file with a foldable & dynamic TOC from an org file? - Emacs Stack Exchange mentioned Worg 👍
You can start your first step by adding any one line from the following
#+HTML_HEAD: <link rel="stylesheet" type="text/css" href="https://fniessen.github.io/org-html-themes/src/readtheorg_theme/css/readtheorg.css"/>
#+HTML_HEAD: <link rel="stylesheet" type="text/css" href="fniessen.github.io_org-html-themes_src_readtheorg_theme_css_readtheorg.css"/>
#+html_head: <link rel="stylesheet" type="text/css" href="https://orgmode.org/worg/style/worg.css"/>
#+html_head: <link rel="stylesheet" type="text/css" href="/path/to/worg.css"/>
OlMon shared a series of CSS that used for Org files
- Org HTML theme collection : emacs (also mentioned fniessen's
readtheorg) - Org Themes collection 👍
- OlMon / org-themes · GitLab
- emacs - org-mode html export - Stack Overflow
Dr. gongzhitao made his own
3.1.3. Before the Start
These two articles have a very easy demo to start:
Worg's homepage provides a repo on how its website is build, but their project is very large, so personally I don't recommend it.
The CSS files I used to DIY are
- The CSS generated by Hexo's NexT.Pisces, located at
./public/css/main.css(just love its color scheme, no other reasons) - Worg's official "answer", where
worg/style/worg.csscan faithfully generate the foldable sidebar TOC.
The structure of my home dir is
.
├── blog.el                    /* script to generate html and deploy */
├── Makefile                   /* make g, make s, make d */
├── index.org                  /* Exactly what you see in https://OChicken.net */
├── static/
│   ├── Cola.png
│   ├── font-awesome/
│   ├── head.html              /* layout */
│   ├── preamble.html          /* layout */
│   ├── postamble.html         /* layout */
│   └── main.css               /* css    */
└── projects/
    └── workspace
        ├── Danke.gif
        └── index.org
3.2. Layout: header, preamble & postamble
The html file generated by Org mode is shown in the following. Replace the contents in head.html, preamble.html & postamble.html with yourself.
 1: <!-- head.html begins here (ends in line 7) -->
 2: <meta charset="UTF-8">
 3: <meta name="generator" content="Emacs 29.1, Org mode 9.6.6">
 4: <link rel="icon" type="image/png" href="/images/Cola.png">
 5: <link rel="stylesheet" href="/css/main.css">
 6: <link rel="stylesheet" href="/lib/font-awesome/css/all.min.css">
 7: <!-- head.html ends here (begins in line 1) -->
 8: <body>                                           <!-- body begins here (ends in line 39) -->
 9:   <div id="preamble" class="status">             <!-- preamble.html begins here (ends in line 20) -->
10:     <header class="header" itemscope itemtype="http://schema.org/WPHeader">
11:       Title
12:       <nav>
13:         <ul id="menu">
14:           <li><a href="/">Home</a></li>
15:           <li><a href="/research/">Research</a></li>
16:           <li><a href="/projects/">Personal Projects</a></li>
17:         </ul>
18:       </nav>
19:     </header>
20:   </div>                                         <!-- preamble.html ends here (begins in line 9) -->
21:   <div id="content" class="content">             <!-- contents begins here (ends in line 33) -->
22:     <h1 class="title">The title of the post</h1>
23:     <div id="table-of-contents" role="doc-toc">  <!-- TOC begins here (ends in line 31) -->
24:       <h2>Table of Contents</h2>
25:       <div id="text-table-of-contents" role="doc-toc">
26:         <ul>
27:           <li><a href="#第1节">第1节</a></li>
28:           <li><a href="#section-B">Section B</a></li>
29:         </ul>
30:       </div>
31:     </div>                                       <!-- TOC ends here (begins in line 23) -->
32:     <!-- main matter -->
33:   </div>                                         <!-- contents ends here (begins in line 21) -->
34:   <div id="postamble" class="status">            <!-- postamble.html begins here (ends in line 38) -->
35:     <footer>
36:       Powered by GNU Emacs 29.1 (Org mode 9.6.6)
37:     </footer>
38:   </div>                                         <!-- postamble.html ends here (begins in line 34) -->
39: </body>                                          <!-- body ends here (ends in line 8) -->
You can find some samples of these three files, from the html in ./public/ generated by Hexo. Nevertheless, I still recommend you to refer the html that generated by Org mode (e.g. shellcodes's) because most of the generated tags and classes are different.
3.3. Build: Makefile & blog.el
Hexo uses hexo g, hexo s, hexo d to generate html, preview locally, and deploy to git. You can write your own Makefile by make g, make s, make d.
The equivalence of hexo g is emacs --script blog.el. The core contents of blog.el is the following, which would generate all Org files to html files at the same dir.
(package-initialize)
(require 'ox-html)
(require 'ox-publish)

(setq org-publish-project-alist
       '(("blog"
          :base-directory "."
          :publishing-directory "."
          :recursive t
          :publishing-function org-html-publish-to-html)))

(setq org-html-head      (with-temp-buffer (insert-file-contents "static/head.html")      (buffer-string))
      org-html-preamble  (with-temp-buffer (insert-file-contents "static/preamble.html")  (buffer-string))
      org-html-postamble (with-temp-buffer (insert-file-contents "static/postamble.html") (buffer-string)))

(add-to-list 'org-html-mathjax-options '(path "https://cdn.mathjax.org/mathjax/latest/MathJax.js?config=TeX-AMS_HTML"))

(org-publish-project "blog")
The equivalence of hexo s is python -m http.server -d ./, then preview the blow in your browser by http://localhost:8000/.
hexo d, "d" means "deploy". You can do this via scp, rsync, Emacs's Tramp etc.
The provided blog.el & Makefile are in the repo. blog.el is tailored to my dir tree and utilized some elisp techniques (thus it's not so simple at the first glance).
3.4. CSS
As stated before, the CSS files I used to DIY are
- The CSS generated by Hexo's NexT.Pisces. It's huge, more than 2000 lines.
- Worg's official "answer", approx 1000 lines, but the parts that only worth money are lines 74 to 110, which involves the config of sidebar TOC.
The sidebar TOC requires some js trick. Recall the layout, if you modify the generated html code, that put the codes of TOC to the nav tag after menu's ul (unordered list), its position is exactly correct!
So the task now turn to, how to shift the TOC part into the nav tag every time you generate the html files. ChatGPT taught me:
<script>
  var toc = document.getElementById('table-of-contents');  /* get TOC */
  document.querySelector('nav').appendChild(toc);          /* Append the TOC to the nav */
  toc.querySelector("h2").innerHTML = "<i class=\"fa fa-list fa-fw\"></i> TOC";  /* change title */
</script>
This is a js snippet, place it after the footer tags then every thing works. The third line is to change the TOC's name "Table of Contents" to three letters "TOC", which is exactly what you see in the top left.
There are still several facts should care:
- In Org files,
*represents h1,**represents h2, and so on. However in the generated html files, h1 tag wraps the title of the blog (e.g. "Emacs Workspace: IDE + Yet Another Jupyter" is actually h1), while h2 tags wraps the chapters begin with*. - CSS's ul (unordered list), ol (ordered list) etc are called
org-ul,org-oletc in the html generated by Org mode.
There is a personal preference worth mentioned. The main matter of my blog is not so wide as NexT.Pisces theme. One reason is that, the default width is 60em in the variable org-html-style-default (use C-h v to view it), another reason is, this width is similar to the typesetting of an A4 PDF paper, so that reading my blog will give you almost the same experience as reading a PDF.
Though NexT.Pisces's CSS is huge (more than 2000 lines), but the core part I need is exactly 300 lines, and don't need any js.
4. Mini IDE: Syntax Check, Complete, Compile
The title is self-explained. What you need are Flycheck + Company + Projectile + Ibuffer-Projectile. Such a mini-IDE don't need eglot or lsp-mode.
cd to mini-ide to have a try. You can do make in terminal, or alternately in Emacs:
M-x compile RET make
Note: though there is a project dir ede/, it is actually NOT a project built by Emacs's EDE, but purely the familiar GNU make, see this video. This name merely indicates that what EDE doing is nothing but the familiar GNU make process.
4.1. Flycheck & Include Path
Flycheck is ready to go-out-of-the-box (开箱即用) after you set the follows. Use C-c ! c to rerun it and C-c ! l to list errors.
(dolist (hook '(prog-mode-hook text-mode-hook))
  (add-hook hook 'flycheck-mode))
The global search path is configured in .emacs.d/'s file:
(setq flycheck-clang-include-path
      (list
       (expand-file-name "~/.local/include/")
       "/usr/share/verilator/include/"))
Paths like /usr/include/ and /usr/lib/gcc/.../include/ are automatically searched, so need not add.
The local search path is .dir-locals.el in your project dir. Its content is
((c-mode . ((flycheck-clang-include-path . ("/absolute/path/to/mini-ide/include"
                                            "/absolute/path/to/mini-ide/build")))))
After you set .dir-locals.el, do C-x x g to revert the opened c file.1
Emacs's team also has Flymake. You'll dislike it after having a try. I assure you.
4.2. Company
Company is ready to go-out-of-the-box after you set
(add-hook 'after-init-hook 'global-company-mode)
4.3. Projectile
Projectile is ready to go-out-of-the-box after you set
(projectile-mode +1)
(define-key projectile-mode-map (kbd "C-c p") 'projectile-command-map)
Ibuffer-Projectile is used to group the buffers in the same project so that you can have a more nicer view in the buffer list. So you need an "indicator file" to mark that "this path is a project". Projectile has a built-in solution: just create an empty file .projectile in it. You can add many other "indicator files" in the following way:
(dolist (file '(".dir-locals.el" ".ccls" "compile_flags.el"))
  (add-to-list 'projectile-project-root-files-bottom-up file t))
4.4. Identifier References (jump-to-&-back)
Identifiers are also known as tags. An identifier is a name of a syntactical subunit of the program: a function, a subroutine, a method, a class, a data type, a macro, etc. In a programming language, each identifier is a symbol in the language's syntax. In a large programming project, it's vital to quickly find where an identifier is declared, defined & referenced. Emacs provides a unified interface to these capabilities — xref.
This task requires mode-specific knowledge, to search for identifiers, find references to identifiers, complete on identifiers, etc. xref delegates the mode-specific parts of its job to a backend provided by the mode. A backend can implement its capabilities in a variety of ways:
etags-like commands to generateTAGSfile, orSemanticto generate a database. Major modes for languages supported byetagscan use tags tables as basis for their backend. So usingTAGSfile as a backend has a huge drawback: you must update yourTAGStimely.Eglotorlsp-mode. The language server protocol. LSP does NOT introduce the concepts like "symbol table" orTAGSfile, but use message protocol as a support backend.
A work-around is, for system headers, you can simply generate a TAGS file for them, which does not need to open lsp; while for the current project, open lsp to perform real-time analysis. Here is a basic idea on how to generate TAGS for system headers:
4.4.1. Find Identifiers (29.4.1)
29.4.1 Find Identifiers (GNU Emacs Manual)
29.4.1.1 Looking Up Identifiers (GNU Emacs Manual)
29.4.1.2 Xref Commands (GNU Emacs Manual)
Use these commands to jump among the function definitions:
M-.                            # xref-find-definitions
M-,                            # xref-go-back
M-?                            # xref-find-references
4.4.4. Semantic
Semantic is an alternate framework to generate tags: in its context, the TAGS files is a database in .emacs.d/semanticdb/.
Use semantic-ia-fast-mouse-jump to jump to the definition: 2.4.3 Smart Jump (Semantic Manual). But its problem is, it cannot jump back 😂 so you need properly set: emacs semantic,speedbar,gdb汇总 - 小石王 - 博客园
I am not the Semantic user, but still put the settings I have tried (it works, of course):
(require 'semantic)
; Semantic buffer evaluator
; file:///usr/share/emacs/29.1/lisp/cedet/semantic.el.gz
(global-semanticdb-minor-mode 1)
(global-semantic-idle-scheduler-mode 1)
(global-semantic-idle-summary-mode 1)
(semantic-mode 1)
(semantic-add-system-include "/usr/include/")
(semantic-add-system-include "/usr/share/verilator/include/")
(semantic-add-system-include "/usr/src/linux/")
(define-key semantic-mode (kbd "M-.") 'semantic-ia-fast-jump)
4.5. About Emacs's EDE
TLDR: Emacs's built-in EDE is a white elephant (鸡肋). Write your own Makefile then M-x compile RET make is better.
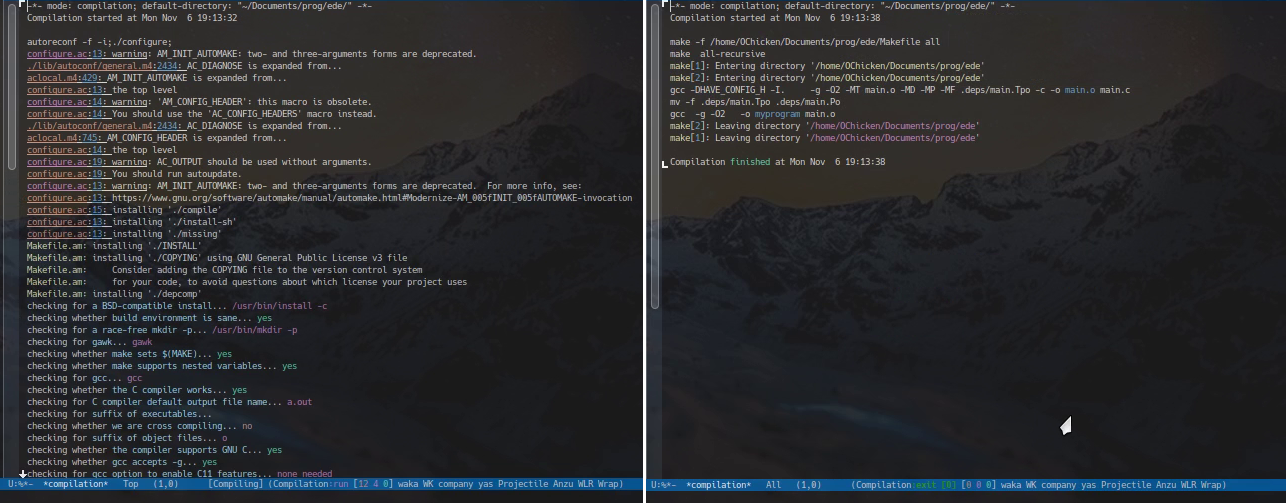
ede is a sample project on how to write GNU make. cd to it and do:
mkdir build m4
autoreconf -i; cd build; ../configure; make all
make-clean.sh
automake: 2.4.1 Creating amhello-1.0.tar.gz 🚩
29.5 EDE (GNU Emacs Manual)
3. Quick Start (EDE)
EDE manual - GNU Project - Free Software Foundation (FSF)
Emacs provides a built-in EDE to help you generate configure.ac & Makefile.am, the two essential files for a typical GNU-make project. However, few body says EDE is convenient to use:
Does anyone use "EDE" (Emacs Development Environment)? If so, what do you like/dislike about it and how does your config look for it? : emacs
I was a long time EDE user, but basically had to give it up.
- It's no longer maintained, so the bugs that are in there are staying in there.
- It is difficult to set up and configure, compared with e.g. Treemacs + lsp-mode.
So there it is. EDE, CEDET, all that has been supplanted by newer and better things like LSP.
我自己使用 EDE 的体验是, 其文档 Quick Start 实际上做的只是这三连命令. 但凡有过一点写 configure.ac 和 Makefile.am 的经验的人, 都不会认为把这种可以自行高度定制化的任务外包给一个年久失修的项目去生成, 是简化了工作的, 甚至是安全的.
My experience on using EDE is, what its Quick Start talking about is nothing but the following commands. Anybody has experience on writing configure.ac & Makefile.am will NOT think that it's "simplified your life" (and even safe) to outsource such a highly customizable task to an outdated project.
autoreconf -f -i; ./configure; make -f Makefile all  # EDE's commands
autoreconf -i; cd build; ../configure; make all      # You can put the *.o to build/
4.6. LSP Tools: Eglot & lsp-mode
As the title explains, LSP tools are encompassed, Eglot & lsp-mode are two of them. Readers should familiar that they are two competitors. I use Eglot.
4.6.1. Background
Readers should familiar with the fact that clangd is the backend of LSP, but besides clangd, there are other options such as ccls etc. However, gcc is not served as the backend of LSP.
gcc was born relatively early, initially designed to integrate all stages of compilation, including lexical analysis, syntax analysis, semantic analysis and code generation. Four tasks are tightly coupled (this probably also explains the meaning of "cc": compiler collection). Later, as compiler and editor technologies evolved, people realize that the lexical/syntax/semantic analysis during editing does not require machine code generation, and that decoupling the frontend and backend has much benefit. So the concept of intermediate representations was introduced as a common interface that allowed the first three tasks to be accomplished without generating the final machine code, which provided a more flexible interface to editors and other tool-chains. Modern compilers, such as clangd and ccls, have the advantage of doing real-time syntax checking during front-end editing, which gcc is not capable of doing.
You can choose either "Eglot + ccls" or "Eglot + clangd". I will talk about them here. I am not the lsp-mode user, but also not the faithful user of Eglot: actually, the tools involved in Mini-IDE have been with me for a long time.
4.6.2. Eglot Basic Use
After setting compile_commands.json (for clangd) and/or .ccls (for ccls) in the project root, M-x eglot to open. The candidates of eglot-xxx are not so much, altogether 31. Three of them are what you want:
eglot-find-declarationeglot-find-implementationeglot-find-typeDefinition
In the variable eglot-server-programs, there are two candidates: clangd & ccls. Set the following to use clangd by default:
(add-to-list 'eglot-server-programs '((c++-mode c-mode) "clangd"))
4.6.3. Eglot + clangd
The contents of the project dir eglot-clangd is exactly the same as mini-ide: a series of Makefile are prepared. As they are prepared, do this command in the project root
bear -- make
which will generate the important compile_commands.json. Its content is
[
  {
    "arguments": [
      "/usr/bin/cc",
      "-I../include",
      "-I../build",
      //...
      "mylib.c"
    ],
    "directory": "/absolute/path/to/eglot-clangd/",
    "file": "/absolute/path/to/eglot-clangd/src/mylib.c",
    "output": "/absolute/path/to/eglot-clangd/build/libmylib.so"
  }
]
The official site of clangd itself has guidance on using Eglot with clangd backends (the basic usage of Eglot is not in Eglot's official site, but in clangd's, surprise?)
4.6.4. Eglot + ccls (buggy)
Put .ccls to the projects folders. Its content is the following:
clang
-I./include
-I./build
Refs:
5. Vielen Dank

Buy me a Cola (1.3EUR) or an ice cream (1.5EUR) or a cup of 喜茶 (30CNY) or a meal of 鑫隆 (5.9EUR) 😋
PayPal: [email protected]; WeChat Pay
Footnotes:
Setting .dir-locals.el in this way covers the global settings, so that if you #include <header.h> where header.h located in ~/.local/include, Flycheck would warn header not found. However, if you alternately use setq or add-to-list to append the local settings to the global, there would gives an "unsafe warn", if you type 'y' or '!', the local paths are merged with the global (the distinguish between local and global vanishes), and register in safe-local-variable. This tricky fact is due to the "trust safe local var" nature in elisp. I have an unsatisfactory workaround up to my current knowledge, but want to keep it secret.